Phanteks Enthoo EVOLV ITX SE White Case Review
Author: Dennis GarciaInstall and Conclusion
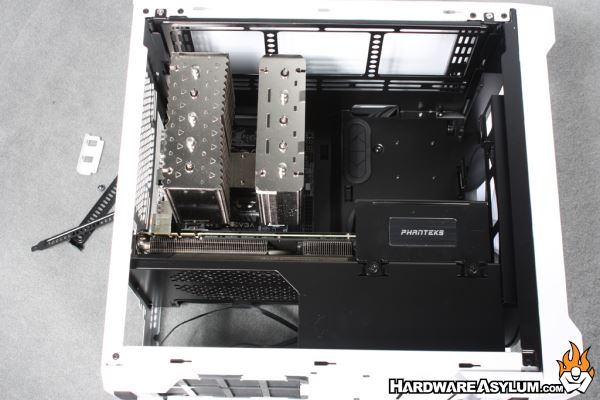
Installation goes about how you would expect. Motherboard mounted vertically allowing you to use the rest of the space for whatever cooler you happen to install. I’m using a generic dual tower cooler using 140mm fans and there is still plenty of clearance around the cooler and top of the case. The distance between the heatsink and back fan location is a little tight but largely depends on if you mount the fan to the cooler or the case.

The area to the right of the motherboard is basically empty and can be a good thing for case ventilation given the large volume of air loitering around. Of course you could mount your pump and/or reservoir in that location or mod in the skull from the T-101. Personally I would leave the location open and maybe place a Hardware Asylum flame guy sticker and call it good.
For this install I used an EVGA GTX 980 Ti with the stock ACX 2.0 cooler and found that it fit perfectly. In fact there seems to be enough room to install the Classified edition with a slight modification to allow access to the PCI Express power connections.
When I first saw this case at CyberPowerPC I was immediately impressed with the outward appearance and how CyberPowerPC had assembled the machine. Having looked at the Phanteks Enthoo EVOLV in person I can see why it was picked for that particular build and it is one of the better layouts I have seen for a Mini ITX system build.
The motherboard sits vertical like in a standard Mid and Full Tower case with the Power Supply at the bottom. You’ll find a two drive rack at the bottom of the case that supports both 3.5” and 2.5” hard drives. A single SSD can be mounted vertically on the backside of the motherboard tray and if you needed one more drive there is an optional tray mount on top of the video card cover. Sadly there are no external 5.25” drive bays on the EVOLV but, that seems to be the trend with modern cases, especially the smaller SSF designs.
Cooling is handled by a single 200mm fan located at the front of the case but can be expanded to support up to three more 140mm fans and radiators up to 280mm. AIO and DIY watercooling is supported however it is a risk reward when deciding which route to take. AIO is rather simple and takes up less space but cannot support both CPU and GPU on the same loop. If you go DIY you can remove the lower drive rack to make room for your pump and place the reservoir in the open location to the right of the motherboard. Getting air into the case is a bit of a concern. The front panel supporting the 200mm fan is vented along the sides but is a little restrictive for how large the fan is. Likewise if you mount a 240mm of 280mm radiator in the top of the case you only get a small vent at the back of the top bezel to vent all of that air.
Case construction is extremely good with solid connections at each corner and well rounded edges. The pain finish “feels” like powercoat but could be thick enamel. In terms of customizations I would like to see the front metal bezel replaced with modders mesh to allow more airflow into the case. Given that the case in this review is White with Black interior panels it would be difficult to mix in the Hardware Asylum Pearl orange without things looking funny so I’d suggest pin striping the panels and selectively adding a bit of color to the black bits leaving most of it alone. Of course the black on black or black on red versions offer different color combos so purchase wisely.
Solid Construction
Great Cooling Options
200mm Fan Included
Filters
Water Cooling Ready
Optimal Layout
Restrictive cooling though case panels
No external drive bay
Watecooling wipes out most internal storage

Recommend
https://www.hardwareasylum.com


